- @mentioning the Oxy bot in channels
- Using the
/oxyslash command - Sending direct messages to the Oxy bot
Prerequisites
Before you begin, you’ll need:- An externally reachable HTTPS URL for your Oxy instance (e.g.,
https://oxy.yourcompany.com) - Admin rights for the Slack workspace you want to connect
For local development, you can use a tunneling service like ngrok to expose your local Oxy instance.
Setup
1
Create a Slack app from the manifest
- Go to Slack Apps and click Create New App
- Select From a manifest
- Choose your target workspace and click Next
- Switch to the YAML tab
- Copy the manifest below, replacing
{{YOUR_OXY_BASE_URL}}with your Oxy base URL (e.g.,https://oxy.yourcompany.com):
Slack App Manifest
- Paste the modified manifest and click Next
- Review the scopes and click Create
2
Add Slack configuration to config.yml
Add the The
slack section to your config.yml:config.yml
default_agent is the Oxy agent that will respond to Slack @mentions and direct messages. Point this to an existing agent file in your project.3
Copy the Signing Secret
- In the Slack app settings, go to Basic Information
- Under App Credentials, copy the Signing Secret
- Add the signing secret to your environment:
.env file:.env
4
Install the app to your workspace
- In the left sidebar, go to OAuth & Permissions
- Under OAuth Tokens, click Install to Workspace and approve the permissions
If you’re not a workspace admin, you’ll see Request to Install instead. A workspace admin will need to approve the request.
- Copy the Bot User OAuth Token (starts with
xoxb-) - Add the bot token to your environment:
.env file:.env
- Restart your Oxy instance to pick up the bot token
5
Test the integration
- In Slack, invite the Oxy bot to a channel:
/invite @Oxy - Test with a mention:
@Oxy what can you help me with? - Or use the slash command:
/oxy hello
Enable the AI Agent Sidebar
Slack provides a dedicated AI agent sidebar for chatting with assistants like Oxy. This needs to be enabled for users to access the DM experience.For Workspace Admins
To enable the Oxy agent for all members in your workspace:- Click your workspace name in the sidebar
- Select Tools & settings → Manage apps
- Find and select the Oxy AI app
- Click App settings
- Next to AI agent experience, click Edit
- Choose Enabled to display the agent to all members
- Click Save
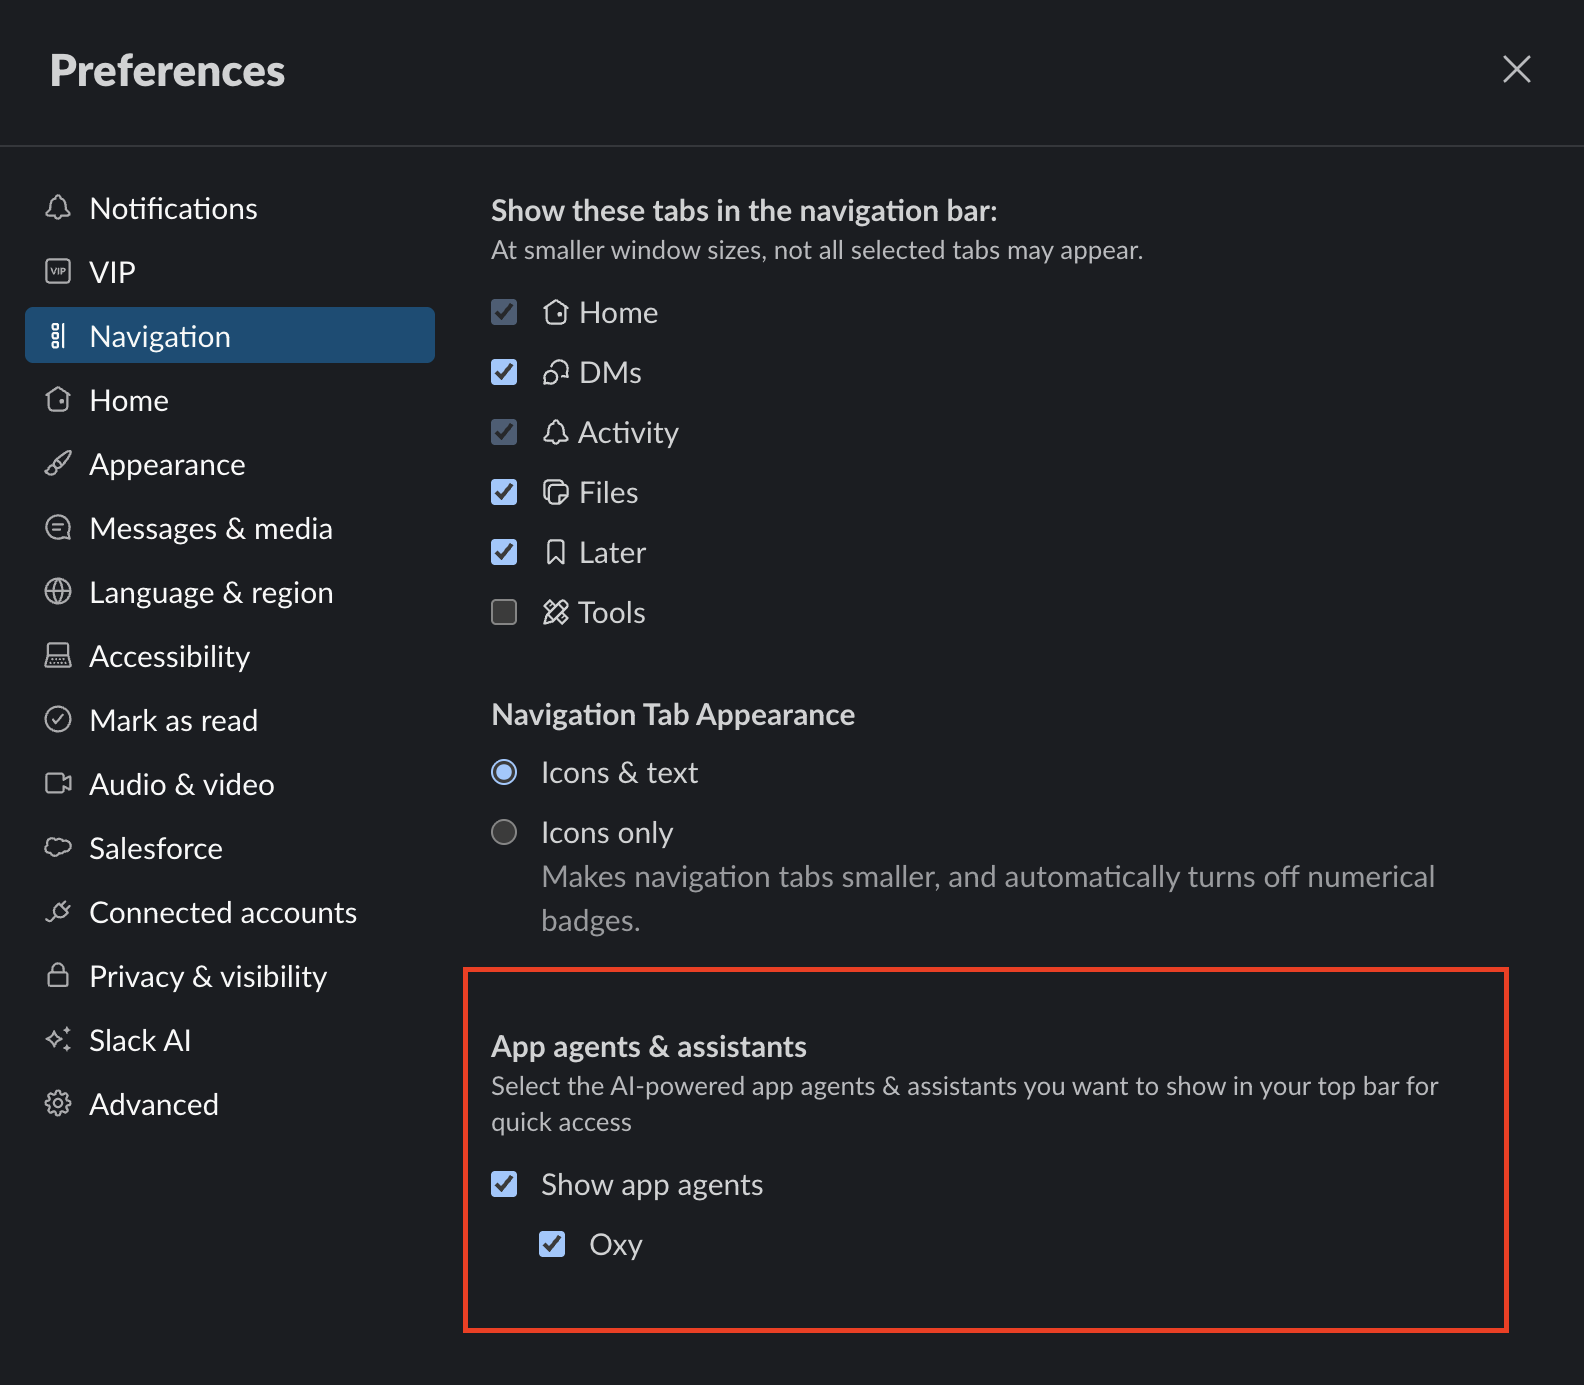
For Individual Users
If not enabled workspace-wide, users can enable the agent in their personal preferences:- Click your profile picture in the sidebar
- Select Preferences
- Go to the Navigation tab
- Under App agents & assistants, check Show app agents
- Check Oxy to display it in the sidebar
For more details, see Slack’s documentation on AI apps.
Configuration Options
| Option | Required | Description |
|---|---|---|
default_agent | Yes | Path to the agent file used for Slack DM conversations and when no channel binding is set |
bot_token_var | Yes | Environment variable containing the Slack Bot User OAuth Token |
signing_secret_var | Yes | Environment variable containing the Slack Signing Secret |
oxy_app_url | No | Public URL of your Oxy instance. Enables “View in Oxy” links in Slack responses |
View in Oxy Links
Whenoxy_app_url is configured, agent responses in Slack will include a “View in Oxy” link. Clicking this link opens the conversation in the Oxy web app, where users can see:
- SQL queries generated by the agent
- Data tables and query results
- Visualizations like charts
- Other artifacts from the conversation
oxy_app_url to the publicly accessible URL of your Oxy instance for these deep links to work correctly.
If
oxy_app_url is not set, responses will not include “View in Oxy” links.Example Configuration
config.yml
Channel Bindings
By default, all channels use thedefault_agent specified in your config. You can bind specific channels to different agents using the /oxy bind command:
Troubleshooting
- Can’t find the Oxy agent in Slack: Enable it in Preferences → Navigation → App agents & assistants (see Enable the AI Agent Sidebar)
- Bot doesn’t respond: Verify your
SLACK_BOT_TOKENandSLACK_SIGNING_SECRETare set correctly - URL verification failed: Ensure your Oxy instance is running and publicly accessible at the URL specified in the manifest. In your Slack app settings, go to Event Subscriptions and check that the Request URL shows “Verified”. If not, click Retry to re-verify. This is often necessary after changing the request URL in the manifest or on that page.
- Permission errors: Check that the bot has been invited to the channel with
/invite @Oxy - Signature verification failed: Confirm the signing secret matches between Slack and your environment